Gluing an aquarium is not difficult. In any case, it’s a beautiful DIY process that can save you money. Whether you want to make your own aquarium or expand an existing one with filter compartments, the principle of gluing is the same.
There is an old saying, “practice makes perfect” and as a DIYer, I can speak to that. The best advice I can give is to start by making a small breeding tank or modifying an existing aquarium with an internal filter compartment. I think the investment in money and time is not wasted.
Even if gluing a bulkhead into an existing aquarium (for an internal filter compartment) didn’t work perfectly, it’s not a waste of money.
If it really failed, which I doubt, then it’s a matter of screaming, removing the partition, cleaning it up and starting over. In the paragraphs below, the collage of an entire fish tank is used as an example.
What are the construction methods
There are two construction methods for gluing aquariums:
- Sidewalls at the bottom of the aquarium
- Side walls next to the bottom of the aquarium
In the literature, the second method is called the more reliable construction. In fact, the first method is not less strong, but it is much easier to make.

image credit discuszolder.nl
Step-by-step plan for gluing the aquarium – (Sidewalls down)
* Before you can glue the glass, you must first clean it with water, dry and dust it and then degrease the edges with alcohol or acetone!

image credit discuszolder.nl
Step 1
Place a bead of aquarium silicone on the back of the aquarium bottom. This bead should be of uniform thickness and thick enough to completely cover the underside of the side wall with silicone sealant.
Place the bottom wall perpendicular to the aquarium floor. See illustration ‘Sidewalls down – steps 1 and 2’.
The bead of silicone sealant is flattened by the weight of the side wall. Make sure the sidewall is parallel to the bottom of the aquarium. You can move the side wall, but do not lift it, or air bubbles will form in the silicone sealant.
Step 2
Place a bead of silicone aquarium sealant on the back wall and the bottom of the right side wall.
Place the right side wall perpendicular to the bottom of the aquarium and against the back wall.
Tip:
Use a piece of painter’s tape to secure the aquarium walls.
Step 3
Place a bead of silicone aquarium sealant on the back wall and bottom of the left side wall.
Place the left side wall perpendicular to the bottom of the aquarium and against the back wall.
Step 4
Place a bead of silicone aquarium sealant on the front of the left and right side walls and on the bottom of the aquarium.
Place the front wall perpendicular to the bottom of the aquarium and against the side walls.
Let the aquarium dry for at least 48 hours before moving the aquarium (glass thickness 4mm)!
Step 5
The aquarium is placed on one side so that the stabilizing strips can be glued easily. In effect, you are using gravity to hold the stabilizing strips in place. Tilting a small aquarium is not a problem, but it is better not to do it with larger aquariums!
Tip!
Use two wooden spacer blocks to support a stabilizer strip. The length depends on the height where the stabilizer strips are placed. You can secure the supports with a piece of painter’s tape! The advantage of this method is that the stabilizer strips are placed at the right height, which makes gluing much easier.

image credit discuszolder.nl
Step 6
If necessary, remove excess silicone sealant with a shovel, hobby knife or razor blade.
Step by step plan for gluing the aquarium – (Side walls next to the bottom)
The procedure is basically the same as for gluing the side walls to the bottom. Only the side walls are next to the bottom. Therefore, the silicone sealant should be applied to the floor of the aquarium or to another place. The important thing to remember is that you place the aquarium on a reusable non-stick paper or baking paper. If you don’t, you will have a work table with a permanent aquarium kit.
Choosing the right aquarium silicone sealant
You have silicone aquarium sealant and you have silicone aquarium sealant and that’s because there are substantial differences between different brands of sealant. What you need to consider is the skin formation time. This is the time frame in which you must process the product. This skin formation time can vary from 6 to 10 minutes and is brand specific. Even the recommended drying times can vary and depend on the substrate, amount of product applied, moisture content and ambient temperature, among other things. It is therefore very important that you read the technical data sheet (manual) carefully before using the product. Good preparation is really essential for the do-it-yourselfer. Because gluing a (large) aquarium is a race against time!
Get comfortable!
BISON Silicone Syringe
As usual, good tools do half the work. You don’t need many tools to glue an aquarium. A good silicone caulking gun is essential for a clean result. With the cheaper silicone syringes, the dosage goes down a bit. What you really don’t want is for the silicone sealant to continue to flow after you turn off the power. You can use a silicone sealant to finish the edges of the sealant. The simplest version looks like a plastic spoon, but has the disadvantage that you can only create hollow joints. Of course, you can also use your finger, but the result is not so neat. Plus, your fingers are full of silicone sealant.
Triangular joints
My preference is for triangular joints with black silicone sealant. First, black silicone sealant is more visible, making it easier to process and easier to detect and correct any errors. The second advantage is that your sealant seams will not discolor if you have used medications that leave a color (e.g. methylene blue). But much more importantly, the seams contribute to the construction. With hollow seams, the edges sometimes want to come off, which allows dirt to accumulate. In poorly sealed aquariums, this increases the risk of leakage. Of course, personal taste should not be forgotten, but I always look for the most reliable option.
Pro Tip
If you are going to breed discus in a breeding tank, it is best to use a clear silicone sealant. This prevents the boy from seeing the black kit like parents. Also, parents perceive darker colored youngsters better on a lighter background. Now you should not exaggerate this problem, because a good couple does not suffer from black sealant.
The clean finish of a DIY aquarium requires some discipline. In any case, your workspace should be a clean environment. I cover the tables I make preparations on with wide wrapping paper.
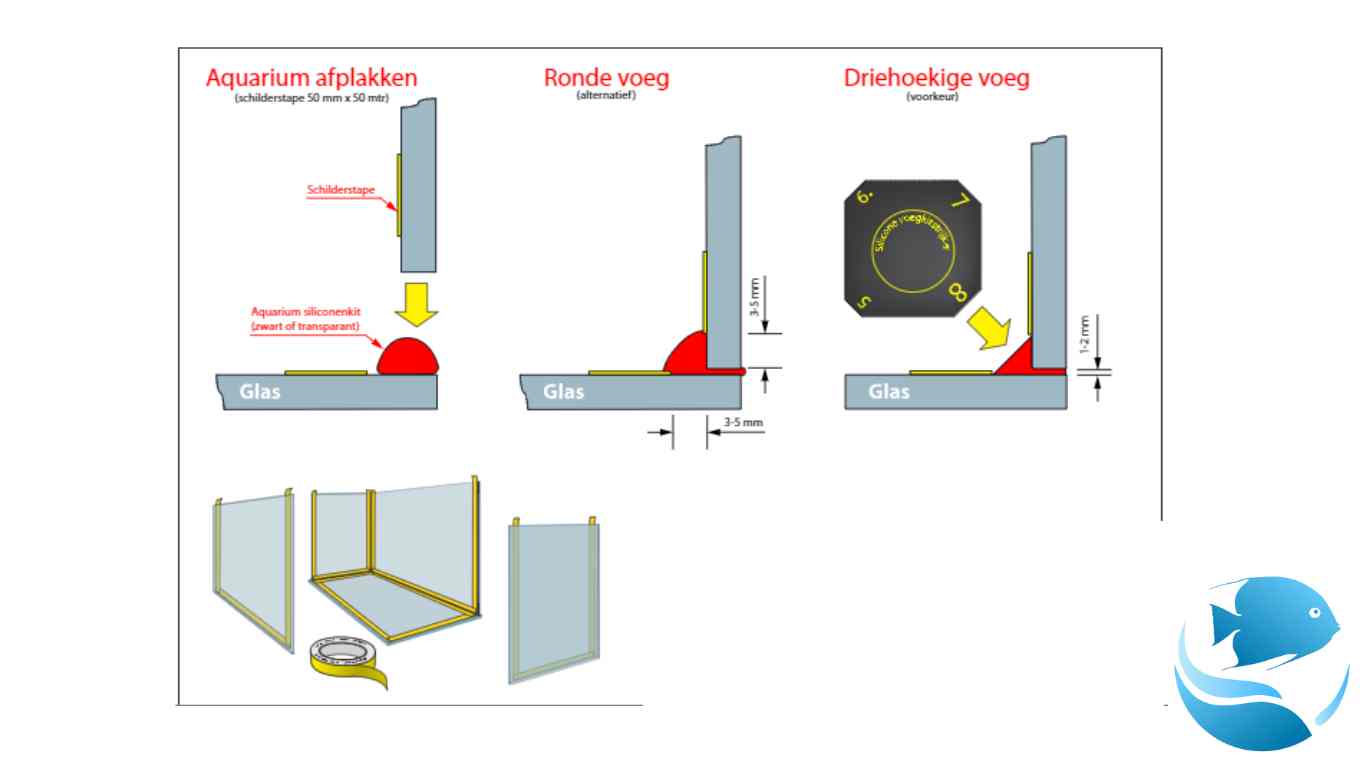
image credit discuszolder.nl
Because I want to keep my aquarium as clean as possible during kitty time, I always tape the edges of the glass with painter’s tape. I’ve found that the wide painter’s tape works best. While smoothing the seams, a little silicone sealant gets on the tape. After smoothing the joints, I remove the painter’s tape. The result is that you have straight finished joints and your aquarium stays clean!
Tips
If possible, I let the painter’s tape run a little past the glass. When removing, I can use this superfluous piece of painter’s tape as a handle. I lower the removed painter’s tape onto an old newspaper. After removing the painter’s tape, I roll up the newspaper and dispose of it in the desired trash can. If you spill silicone sealant on the aquarium, just leave it. Once the silicone sealant has dried, you can remove the excess silicone sealant with a cutter or razor blade.
References
How to a glue an aquarium, https://discuszolder.nl/aquarium-lijmen/, retrieved december 23, 2022.

I’m Benjamin, an aquarium, and fish hobbyist for more than three decades now.
My passion for aquarium fish never wavered after so many years. I keep consuming everything about fish tank, aquariums and alike.
As a result of my experience with aquariums and fish, I have decided to build this blog.
My goal is to answer all your questions – and even those you haven’t asked yourself yet – so you can take care of your fish and aquariums. From one passionate to another passionate!
- Feeding Eggs To Fish - December 27, 2022
- Cure Swim Bladder Disease In Fish - December 27, 2022
- Can Damaged Fins Grow Back? - December 27, 2022